Until I read a post on My Style Vita about it, I had actually never heard of Candlefish, but I had been looking for a place to take a candle-making lesson. For a while I’ve entertained the thought of making my own candles and even trying to sell them, though right now I don’t feel like I have the room to store all the various equipment needed for this venture. Anyway, the My Style Vita post offered a 15% off coupon that applied to the cost of the class, so I told my friend Melissa the code too and we booked a class. Thanks for that code, Jessica!
Candlefish is located within Ponce City Market, a place that–in my view, anyway–has some cool aspects (it’s nice that they reused a historical building instead of tearing it down) and some less-than-cool ones (the crowds and the backwards parking system…just use Atlantic Station’s pay-on-exit system!). But I put that aside because, hey, candles. We actually had trouble finding Candlefish at first! It wasn’t our first PCM rodeo, either. We soon deduced that the shop is not near the food hall, unsuccessfully tried to find a mall-style directory map in 3 different places (for the record: there’s one by West Elm), went outside to the courtyard and found it next to Alex and Ani. By the way, the store is so new that it wouldn’t have been on the directory anyway.

When you walk into the small (yet not cramped) store, one of the first things you see is this fantastically old-fashioned looking display. This is the library, featuring 100 scents identified only by a number. You can find out what notes are in each one, mainly by asking one of the friendly people working there, though. Their website also offers up explanations of the notes in each scent sorted by theme.

Here is one of the shop’s areas, featuring displays of different candles and accessories. One table offered candles that purported to have scents inspired by cities.

This is the workshop area where classes are held. I think the table seats 10 while also offering the instructor ample space to explain and demonstrate each step in the process.

ARE Y’ALL READY FOR SOME SCIENCE? These are all the tools provided for you to craft two 9 ounce candles of the same scent: candles, wicks, labels, beaker for scent oil, handled container for wax, whisk, popsicle sticks, ruler, eyewear and cards that identify your creation and allow you to discover which scents you like.
First, you pick a scent. There were 20 scents spread out around the workshop area with cards bearing their notes, though the cards were facing away to preserve an air of mystery. These were 20 of the most popular. You take the numbered card and go around sniffing candles with each scent, circling or crossing out ones that you like or dislike. This is the one part I would maybe change–I’d bring out candles from all 100 scents so everyone could try every scent. Melissa and I tried all 20 put out for us and then we wandered over to the library to try out lots of the other ones, but so did other students of the class, and it created a bit of a logjam that kept us from reaching candles of some numbers, mainly the higher ones.
After much deliberation, I picked scent 88, which is lemon, tulip and musk. Melissa picked scent 69, which is maple, brown sugar and bourbon. My scent is in the Green & Natural collection and hers is in the Epicurean collection. 88 is my birth year, so I liked that number too.
Then it was time for science. Bottles of the fragrance oil for each chosen number were brought out and we were directed to pour 1.6 ounces of oil into our beakers. Because the beaker measured in milliliters, we used little food-size scales to weigh out the oil. It was about 500 milliliters of oil, at least for me. Instead of having to melt soy wax flakes, a mysterious giant metal box with a spigot dispenses hot wax, which we poured from large steel containers into our smaller ones. We needed about 16.2 ounces and again used the scale for that. Thus, it’s about a 1:16 ratio of oil to wax for a 9 ounce candle. I think.
The oil was poured into the wax, stirred thoroughly with the whisk and then we allowed time for the wax to cool to 110 degrees. At this time, you are encouraged to shop and take advantage of a 15% off everything discount given to students on their class day. During this break, I bought this Magick candle by Lindbergh Candle Company. Its juicy fruity scent is really quite magical!
Once the wax was down to 110 degrees, we glued the wicks to the bottom of our votive glasses using hot glue guns. I feel like I didn’t do super well at this part, maybe due to a little hesitation around using hot glue guns for the first time in years, but I did see if the glue at least held by trying to tug the wicks up, which didn’t make the wick move. I also figured the wax would help keep the wick down if it tried any funny business.
Wicks in place, we also filled out and affixed the labels, along with circular warning labels. Then, it was pouring time! The bits of rulers have a thick mark on them near the 3 inch mark. That’s the fill line. Place the ruler upright behind the votive and then pour wax until you reach that fill line. Repeat on your second candle. Use the popsicle sticks to keep the wicks upright–or, in my case, use popsicle sticks, your ruler and Melissa’s ruler because my wicks were drooping even after using a popsicle stick.

Nailed it…maybe? You don’t know right away. Once you pour the wax, you’re done–the candles set overnight and then you can come pick them up the next day. That’s kind of too bad, really, because you just want to take them home and enjoy them right away, but alas. The store will look after your candle for the week following your class, just in case you can’t get there the next day.
Our class was on a Saturday, so I was able to get down there the next day for pickup. No matter when you made the candles the day before, they’re ready for you as soon as the store opens.
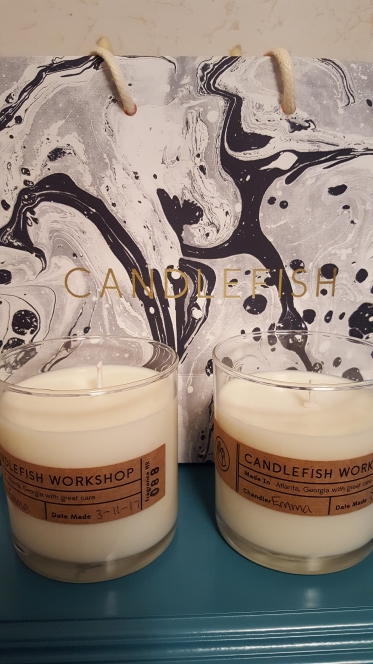
Ta-da! They look great and smell terrific, both when lit and unlit.
Overall, I had a great time at the class! I only have the one gripe about making all the scents readily available to students so they can make the most informed decision, but maybe if your class has smaller attendance or you’re just good at asserting your physical presence, you can get to sniff all of them at the library. Candlefish also allows you to bring in your own beverages, adult or otherwise, and has drink glasses along with cafe-style water bottles in cool marble buckets.
The normal cost for a class is $55, but when you think about how you’re making two sizable candles with soy wax and you compare the class’ cost to the price of similarly-crafted candles, it’s a good deal. Classes are offered on Sundays, Wednesdays, Thursdays, Fridays and Saturdays. Weekdays tend to have just one class at 7 pm while weekends have two, one at an earlier afternoon time and one at a later time.
Candlefish also offers classes on creating two different unique scents and making candles with them, which cost $65. These classes are new, so they are offered less often right now. They are also launching a class that allows students to paint glass vessels with unique patterns and then fill those vessels with candles. That class is $65 as well.
Candlefish’s site has an expanded selection of items, including jewelry, soap, glassware, stationery, key tags, art and candle subscription boxes.